Target Audience: Are you speaking to absolute beginners or those with a tiny bit of experience?
So, you’re thinking about venturing beyond the campground, huh? Trading those well-worn paths for something a little more, shall we say, wild? That’s fantastic! But before you grab your tent and head into the great unknown, let’s talk about navigation. Getting lost isn’t just inconvenient; it can be downright dangerous. This guide is designed for absolute beginners—those of you who might think a compass is just something that points north. We’ll break down the essentials, so you can explore with confidence and, most importantly, make it back!
Why Bother with Navigation Skills?
Alright, why not just rely on your phone? Well, here’s the thing: batteries die. Signals disappear. And that shiny gadget isn’t much use when it’s bricked. Knowing how to navigate with a map and compass, understand trail markings, and use a GPS device effectively isn’t just a cool skill; it’s a safety net. Think of it as your ‘get out of the woods free’ card.
Essential Gear: The Navigation Starter Pack
Let’s equip you. You don’t need to break the bank to get started. Here’s a list of must-haves:
- A Topographic Map: This isn’t your highway roadmap. Topo maps show elevation changes, water sources, and terrain features. You can often find these at outdoor stores or online. One popular supplier of maps is USGS
- A Compass: A basic baseplate compass is perfect for beginners. Brands like Suunto or Silva are reliable choices.
- A GPS Device (Optional): A handheld GPS or a GPS-enabled watch can be a huge help, but don’t depend on it solely. It’s just another tool in your kit, not your only tool. This is also a good time to bring up personal locator beacons, also called PLBs. These can be very helpful in case of emergency. Check out REI’s PLB offerings.
- A Whistle: For signaling in emergencies. Three blasts are the universal distress signal.
- A Headlamp or Flashlight: Even if you plan to be back before dark, things happen. Always have a light source, and extra batteries.
- A Notebook and Pencil: To jot down notes, bearings, or changes in your route.
It is tempting to just go with your phone, but you never know when it will die. Always pack the essentials!
Understanding Topographic Maps: Reading the Land
Okay, so you’ve got a topo map. Now what? These maps are packed with information, but they can seem overwhelming at first. Let’s break it down:
- Contour Lines: These lines connect points of equal elevation. Closely spaced lines mean steep terrain; widely spaced lines mean gentler slopes.
- Elevation: The elevation is usually marked on contour lines. Look for bold lines with numbers indicating the height above sea level.
- Symbols: Maps use symbols to represent features like roads, trails, rivers, buildings, and vegetation. A map legend will explain what each symbol means.
- Scale: The scale tells you the ratio between the distance on the map and the distance on the ground. For example, a scale of 1:24,000 means that one inch on the map represents 24,000 inches (2,000 feet) on the ground. You know what? That can be confusing! Just remember that a larger scale (like 1:24,000) shows more detail but covers a smaller area.
Practice reading your map before you hit the trail. Orient yourself by matching features on the map to what you see around you. Can you spot that distinctive peak? How about that bend in the river? Use those landmarks to confirm your location.
The Compass: Your Directional Guide
Now for the compass. It’s simple, reliable, and doesn’t need batteries. Here’s how to use it:
- Know Your Parts: The baseplate, the magnetic needle, the rotating bezel (or compass housing), and the direction-of-travel arrow.
- Orienting the Compass: Place the compass on the map. Align the edge of the baseplate along the line representing your desired direction of travel. Rotate the bezel until the “N” (North) on the bezel lines up with north on the map. Make sure to account for declination!
- Accounting for Declination: Declination is the difference between true north (the North Pole) and magnetic north (where your compass needle points). You’ll need to adjust your compass reading to account for declination. You can find the declination for your area on your map or online. Most compasses have an adjustable declination, making this process easier.
- Taking a Bearing: Hold the compass flat in your hand. Rotate your body until the red (north) end of the magnetic needle aligns with the orienting arrow on the compass housing. The direction-of-travel arrow now points in the direction you want to go. Pick a landmark in that direction and walk towards it. Repeat the process as needed.
Practice using your compass in familiar surroundings before venturing into the backcountry. Get comfortable taking bearings and following them accurately.
Map and Compass Together: The Dynamic Duo
Alright, let’s put it all together. Using a map and compass together is where the magic happens. Here’s how to navigate a route:
- Plan Your Route: Before you leave, study your map and choose your route. Identify key landmarks, trail junctions, and potential hazards.
- Determine Your Bearing: Use your compass to find the bearing (direction) from your starting point to your first landmark.
- Follow Your Bearing: Use your compass to follow that bearing, picking landmarks as you go.
- Re-orient Regularly: As you travel, periodically re-orient yourself using your map and compass. Make sure you’re still on course.
- Note Your Progress: Keep track of your progress by noting the time, distance traveled, and any changes in terrain.
Navigating with a map and compass takes practice. Don’t expect to be an expert overnight. The more you do it, the more comfortable and confident you’ll become.
Trail Markings: Following the Clues
Trails are often marked with blazes, cairns, or other symbols. These markings help you stay on the correct path. But what do they all mean? Here’s a quick guide:
- Blazes: Painted marks on trees, rocks, or posts. They’re usually a rectangle, but can also be other shapes.
- Cairns: Stacks of rocks used to mark trails, especially in rocky or above-treeline areas.
- Ducks: Same as cairns, just a regional name.
- Flags or Ribbons: Tied to branches or posts. These are often used on temporary or less-maintained trails.
Pay attention to the color and shape of the trail markings. Different colors may indicate different trails. If you don’t see a marking for a while, you may have strayed off the trail. Backtrack until you find the last marking and re-orient yourself.
GPS Devices: The Modern Navigator
GPS devices can be incredibly helpful for navigation, but they’re not foolproof. Remember what we said about batteries and signal strength? Here are a few tips for using GPS devices effectively:
- Learn to Use Your Device: Read the manual and practice using your GPS device before you hit the trail. Get familiar with its features and functions.
- Download Maps: Download topographic maps for your area onto your GPS device. This will allow you to see the terrain and features around you, even if you lose cell service or your GPS signal.
- Mark Waypoints: Mark important locations, such as your campsite, water sources, and trail junctions, as waypoints on your GPS device. This will make it easier to navigate back to those locations.
- Check Your Batteries: Always carry extra batteries for your GPS device. And consider bringing a portable power bank for charging your phone or other devices.
Use your GPS device as a supplement to your map and compass skills, not as a replacement. And always have a backup plan in case your GPS device fails.
Staying Found: Tips for Avoiding Getting Lost
Prevention is always better than cure. Here are a few tips for avoiding getting lost in the first place:
- Plan Your Trip: Don’t just head out into the woods without a plan. Study your map, choose your route, and let someone know where you’re going and when you expect to be back.
- Pay Attention to Your Surroundings: Be aware of your surroundings as you hike. Notice distinctive landmarks, terrain features, and changes in elevation.
- Turn Around Occasionally: Look back at the trail from time to time. This will help you recognize the way back.
- Stay on Marked Trails: Unless you’re experienced with off-trail navigation, stick to marked trails.
- Don’t Rely on Technology Alone: As we’ve said before, technology can fail. Always have a backup plan.
Honestly, paying attention is half the battle. Put away the phone and look around!
What to Do If You Get Lost: Stay Calm and Think
Okay, so you’re lost. Don’t panic. Panic will only make things worse. Here’s what to do:
- Stop and Think: Take a deep breath and try to remember the last place you knew where you were. Consult your map and compass. Can you identify any landmarks that might help you re-orient yourself?
- Retrace Your Steps: If you’re not sure where you went wrong, retrace your steps until you reach a familiar landmark or trail.
- Stay Put If Necessary: If you’re truly lost and disoriented, it may be best to stay put. Find a safe place to shelter and wait for rescue.
- Signal for Help: Use your whistle to signal for help. Three blasts are the universal distress signal. Repeat the signal every few minutes. If you have a cell phone, try to call for help, but don’t count on getting a signal.
- Conserve Energy: Stay warm and dry. Ration your food and water.
Remember, most people who get lost are found within 24 hours. Stay calm, stay positive, and do everything you can to help rescuers find you.
Practice Makes Perfect: Hone Your Skills
The best way to improve your navigation skills is to practice. Here are a few ideas:
- Practice in Familiar Surroundings: Start by practicing with a map and compass in your backyard or a local park.
- Join a Hiking Club: Hiking clubs often offer workshops and guided hikes that can help you improve your navigation skills.
- Take a Navigation Course: Consider taking a formal navigation course from a qualified instructor.
- Go on Practice Hikes: Plan short hikes in new areas and practice using your navigation skills to stay on course.
The more you practice, the more confident you’ll become in your ability to navigate in the backcountry. And confidence is key to having a safe and enjoyable camping experience.
Wrapping Up: Go Forth and Explore! (Safely)
Navigating in the backcountry doesn’t have to be scary. With a little knowledge, some essential gear, and plenty of practice, you can confidently explore new trails and discover the beauty of the natural world. Just remember to be prepared, stay aware, and always have a backup plan. Happy trails!
Frequently Asked Questions (FAQs)
DISCLAIMER
This article provides general guidance on camping navigation. Backcountry travel involves inherent risks, and conditions can change rapidly. Always exercise caution, use good judgment, and be prepared for unexpected situations. The author and publisher are not responsible for any injuries, losses, or damages resulting from the use of this information. Consult with experienced guides or instructors for personalized training and advice.
Categories
- Navigation & Safety (68)
- Shelter & Sleep (72)
Top rated products
-
 Ultimate AONIJIE Soft Flask 1000 ml/2000 ml with Water Filter Rated 5.00 out of 5
$41.58Original price was: $41.58.$28.98Current price is: $28.98. -
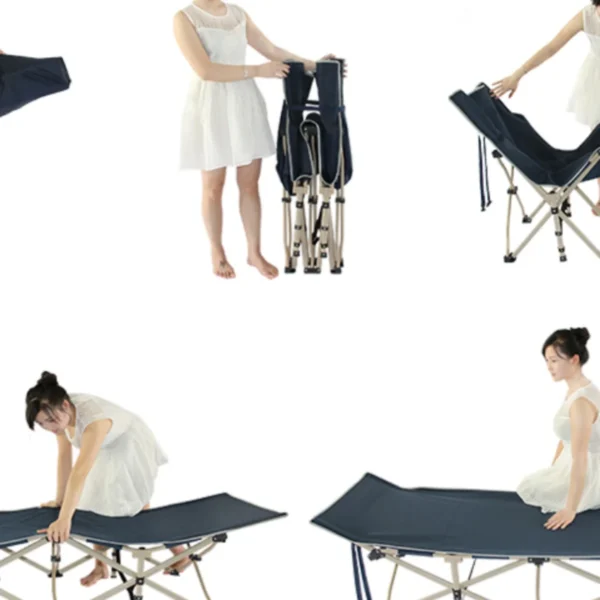
Portable Folding Bed for Office Naps & Outdoor Adventures Rated 5.00 out of 5$168.06 – $305.16Price range: $168.06 through $305.16
-
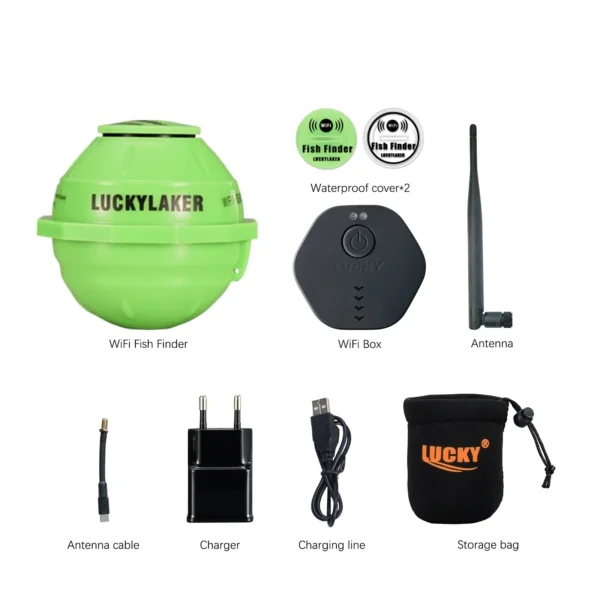
Revolutionize Your Fishing with Lucky Smart Wi-Fi Fish Finder Rated 5.00 out of 5
$197.75Original price was: $197.75.$137.82Current price is: $137.82.

Product Gallery
-
 Ultimate 2-3 Person Inflatable Kayak for Fishing Fun Rated 5.00 out of 5$1,081.72 – $1,095.09Price range: $1,081.72 through $1,095.09
 -
VEVOR 550 lb Heavy-Duty Folding Wagon & Bench for Adventurers
$155.14 – $252.20Price range: $155.14 through $252.20
-
BISINNA One-Touch Titanium Tent for 3-4 Campers, Adventure Ready Rated 4.36 out of 5
$311.78Original price was: $311.78.$217.30Current price is: $217.30.


 Camping Gear
 Camping Chair
 Camping Table
 Camping Bed
 Sleeping Gear
 Storage Bags
 BBQ Portable
 Sleeping Bags
 Camping Tents
 Gazebos
 Outdoor Cooler
 Cookware
 Power
Power Camping Light
 Flashlight
 Portable Solar
 Power Banks
 Fish Finders
 Fishing Bags
 Fishing Jerseys
 Fishing Reels
 Fishing Chairs
 Fishing Bait Boat
 Fishing Floats
 Hard Baits
 Hiking Vests
 Outdoor Bags
 Water Filters
 Paracord
 Walkie Talkie
 Paddleboards
 Boats
Boats Sea Scooter
 Accessories
 Electric Bike
 Electric Scooter
Recent Comments