
Venturing into the great outdoors is an experience like no other. The fresh air, the stunning landscapes, the escape from the daily grind—it’s all incredibly rewarding. But let’s be real: getting lost out there? Not so much. That’s why mastering the art of direction finding is absolutely crucial for every camper, from the weekend warrior to the seasoned explorer. And trust me, it’s not as daunting as it might seem.
Why Compass Skills Are Non-Negotiable for Campers
Okay, so you might be thinking, “I have GPS on my phone. Why bother with a compass?” Well, what happens when your battery dies? Or when you’re in a remote area with zero signal? Technology is great, but it’s not foolproof. A compass, on the other hand, is reliable, requires no batteries, and will work no matter how far off the grid you go. It’s your steadfast companion in the wilderness. Think of it as your analog safety net in a digital world.
Let me explain why a compass is so important. It’s not just about knowing which way is north; it’s about having the confidence to navigate any terrain, in any condition. It’s about understanding your surroundings, making informed decisions, and, most importantly, getting back home safe and sound. Not to mention that it’s kind of fun to learn!
Essential Compass Components: A Quick Anatomy Lesson
Alright, so let’s break down the compass. It’s more than just a spinning needle, you know? Recognizing the different parts and what they do is key to using it effectively.
- Baseplate: This is the clear plastic platform that houses the compass. It’s what you’ll use to align your compass with your map.
- Magnetic Needle: This is the part that always points to magnetic north. One end is usually colored red or white.
- Rotating Bezel (Compass Housing): This is the outer ring that you can rotate. It’s marked with degrees (0-360) and cardinal directions (N, S, E, W).
- Orienting Arrow: This is a fixed arrow inside the compass housing that you’ll use to align with the magnetic needle.
- Orienting Lines: These are parallel lines inside the compass housing that help you align the compass with your map’s north-south grid lines.
- Index Line (Direction of Travel Arrow): This arrow is on the baseplate and indicates the direction you’ll be walking.
Honestly, once you familiarize yourself with these components, using a compass becomes a whole lot less intimidating. It’s like learning the parts of a car before you get behind the wheel. Makes sense, right?
Understanding Magnetic North vs. True North (And Why It Matters)
Okay, here’s where things can get a little confusing, but stick with me. Magnetic north and true north aren’t the same thing. True north is the geographical North Pole, the actual top of the Earth. Magnetic north, on the other hand, is the point where the Earth’s magnetic field lines converge. It’s constantly shifting and is currently located in the Canadian Arctic. This difference is called magnetic declination, and it varies depending on your location.
Why does this matter? Because your compass points to magnetic north, but your maps are usually oriented to true north. If you don’t account for declination, you could end up going in the wrong direction. The amount of declination for your area can be found on your topographical map or online resources. Make sure you know how to adjust your compass for declination before you head out into the wilderness.
Let me put it another way: Imagine you’re aiming for a specific landmark, but you’re aiming your arrow slightly to the side. You’ll still hit something, but it won’t be what you intended. Adjusting for declination is like correcting your aim to hit your target dead center.
Taking a Bearing: Your First Step to Wilderness Navigation
Taking a bearing is the process of determining the direction from your current location to a specific point (like a landmark on your map). Here’s how it’s done:
- Hold the compass level in front of you.
- Point the direction-of-travel arrow (on the baseplate) at the landmark you want to reach.
- Rotate the compass housing until the orienting arrow aligns with the north end of the magnetic needle. Make sure the “red sheds” as they say.
- Read the bearing. Find the degree mark on the compass housing that lines up with the direction-of-travel arrow. This is your bearing – the direction you need to follow.
Seems easy, right? Well, practice makes perfect. Try this in your backyard before you hit the trail. Honestly, it’s a skill that needs to be ingrained in your muscle memory.
Following a Bearing: Staying on Course in the Wild
So, you’ve got your bearing. Now what? Here’s how to follow it:
- Hold the compass level in front of you.
- Rotate your entire body until the north end of the magnetic needle lines up with the orienting arrow. Ignore the baseplate and the direction-of-travel arrow for now.
- Pick a landmark in the distance that lines up with your direction-of-travel arrow.
- Walk towards that landmark.
- Repeat the process. Once you reach the landmark, take another bearing and repeat steps 1-4.
The key is to frequently check your bearing and adjust your course as needed. Don’t just stare at your compass the whole time – look up, observe your surroundings, and make sure you’re staying on track. Think of it as a series of small steps, each guided by your compass.
Map and Compass Harmony: A Match Made in Navigation Heaven
Using a compass with a map is a game-changer. It allows you to pinpoint your location, plan your route, and navigate complex terrain with confidence. This is where the fun really begins, in my opinion. It also ensures that should you get lost, you can identify where you are.
First, you need to orient your map. Align the map so that north on the map points to north on your compass. Then, use your compass to take bearings to landmarks on the map. By intersecting these bearings, you can determine your exact location— something called triangulation. It’s a valuable skill when you are lost, or trying to find your location.
Honestly, map and compass work together like peanut butter and jelly. You should read up on map reading too, it will help immensely.
Advanced Techniques: Back Bearings and Triangulation
Ready to take things to the next level? Back bearings and triangulation are advanced techniques that can be incredibly useful in certain situations.
- Back Bearing: A back bearing is the opposite direction of a forward bearing. It’s used to retrace your steps if you get lost or need to return to your starting point. Simply add 180 degrees to your forward bearing (or subtract 180 if your bearing is greater than 180).
- Triangulation: Triangulation is a method of determining your location by taking bearings to two or more known landmarks. Draw lines on your map along those bearings; where they intersect is your location.
These techniques require practice and a solid understanding of map and compass skills. But once mastered, they can significantly enhance your navigation abilities and potentially save your bacon in a sticky situation.
Practice Makes Perfect: Honing Your Skills in a Safe Environment
I can’t stress this enough: practice your compass skills regularly! Don’t wait until you’re lost in the woods to figure out how to use your compass. Start in your backyard, then move on to local parks and trails. The more you practice, the more confident you’ll become.
Create scavenger hunts for yourself, practice taking bearings to familiar landmarks, and try navigating without relying on your phone’s GPS. The goal is to make using a compass second nature, so you can rely on it when you really need it. Grab a friend and practice following the compass and map to various locations, and reward yourselves with a pastry at the end.
Honestly, this is one of those skills that you need to keep sharp. Like riding a bike, it comes back to you quickly, but you still need to dust off the rust from time to time.
Dealing with Obstacles: Navigating Around Impassable Terrain
Sometimes, you’ll encounter obstacles that prevent you from following your bearing in a straight line. Rivers, cliffs, dense forests – you name it. Here’s how to deal with them:
- The 90-Degree Offset Method: This involves walking at a 90-degree angle from your original bearing until you clear the obstacle, then walking parallel to your original bearing, and finally walking another 90-degree angle back to your original line of travel. This is accurate, but takes time.
- The “Aiming Off” Method: This involves intentionally aiming slightly to one side of your target. When you reach the obstacle, you’ll know which direction to turn to find your destination. This is faster, but less accurate.
Choose the method that best suits the situation and your skill level. And remember to keep track of your distances and bearings so you don’t get lost in the process.
Camp Security: Using Your Compass to Stay Oriented in Camp
Your compass isn’t just for hiking; it can also be useful around camp. Use it to orient yourself within your campsite and to find your way back if you wander off to gather firewood or use the facilities at night. I can not stress the last point enough, remember that campsites are inherently dark, and it’s easy to get disoriented.
Consider taking a bearing from your tent to a prominent landmark, like a large tree or a rock formation. This can be a lifesaver if you wake up in the middle of the night and need to find your way back to camp. When I go camping, I deliberately place our tents with the doors facing a landmark. This can be incredibly helpful!
Emergency Preparedness: Your Compass as a Lifeline
In an emergency situation, your compass can be your most valuable tool. If you get lost or separated from your group, stay calm, assess the situation, and use your compass to determine your location and plan your next move.
Try to retrace your steps to a known location, or use your compass to navigate to a nearby trail or road. And always remember to carry a map, compass, and other essential survival gear whenever you venture into the backcountry. Check in with someone about your ETA, so they know if you are delayed.
Consider packing a survival kit in your backpack as well. You can never be too prepared.
Choosing the Right Compass: Finding the Perfect Navigation Companion
Not all compasses are created equal. When choosing a compass, consider factors like durability, accuracy, and ease of use. A baseplate compass with a liquid-filled needle is a good choice for most campers.
Look for features like declination adjustment, a sighting mirror, and luminous markings for nighttime use. And don’t be afraid to spend a little extra money on a quality compass – it’s an investment in your safety and peace of mind. Companies such as Suunto and Silva are very reputable, and their compasses are very reliable.
Digital Compasses and GPS: Friends or Foes?
Digital compasses and GPS devices can be valuable tools for navigation, but they should never replace your traditional compass skills. Batteries can die, signals can be lost, and devices can malfunction. Think of digital tools as a supplement to your compass skills, not a substitute. Use them wisely, but always be prepared to navigate with a map and compass alone.
You know what? Some people will disagree with me on this, but I’m a firm believer in redundancy. Carry both a digital and analog compass, and know how to use them both. Honestly, it’s just common sense.
Leave No Trace Navigation: Respecting the Wilderness with Your Compass Skills
As responsible campers, it’s our duty to minimize our impact on the environment. Using your compass skills can help you stay on established trails, avoid sensitive areas, and leave no trace of your passage. Always stay on marked trails and avoid cutting switchbacks, which can cause erosion. Pack out everything you pack in, and respect wildlife and their habitats.
Let’s be real, we all want to enjoy the wilderness for years to come, so let’s do our part to protect it. Use that compass to stay the path, eh?
The Zen of Navigation: Finding Peace and Confidence in the Wilderness
Mastering compass skills isn’t just about safety and practicality; it’s also about finding a deeper connection with the wilderness. When you can confidently navigate your surroundings, you can relax, explore, and truly appreciate the beauty of the natural world. There’s something incredibly empowering about knowing that you can rely on your own skills and knowledge to find your way.
Honestly, there’s a certain zen to it. A quiet confidence that comes from knowing you’re prepared for anything the wilderness throws your way.
Conclusion: Embrace the Journey, Navigate with Confidence
So there you have it. Mastering compass skills is an investment in your safety, your confidence, and your enjoyment of the great outdoors. So grab a compass, hit the trails, and start exploring with confidence. The wilderness is waiting!
Remember to always be prepared, stay aware, and respect the environment. Happy camping!
Frequently Asked Questions (FAQ)
DISCLAIMER
Please note that while this article provides guidance on compass navigation for campers, it is essential to prioritize safety and exercise caution in the wilderness. Weather conditions can change rapidly, and terrain can be unpredictable. Always be aware of your limitations, and never attempt to navigate in conditions that are beyond your skill level. Carry appropriate safety gear, inform others of your route, and familiarize yourself with local regulations and guidelines before heading out. Relying solely on this article for navigation is not advisable; seek professional training and guidance to enhance your outdoor skills. The author and publisher are not responsible for any accidents, injuries, or damages resulting from the use of this information.
REI Expert Advice on Navigation
National Park Service – The 10 Essentials
Categories
- Navigation & Safety (68)
- Shelter & Sleep (72)
Top rated products
-
 Ultimate AONIJIE Soft Flask 1000 ml/2000 ml with Water Filter Rated 5.00 out of 5
$41.58Original price was: $41.58.$28.98Current price is: $28.98. -
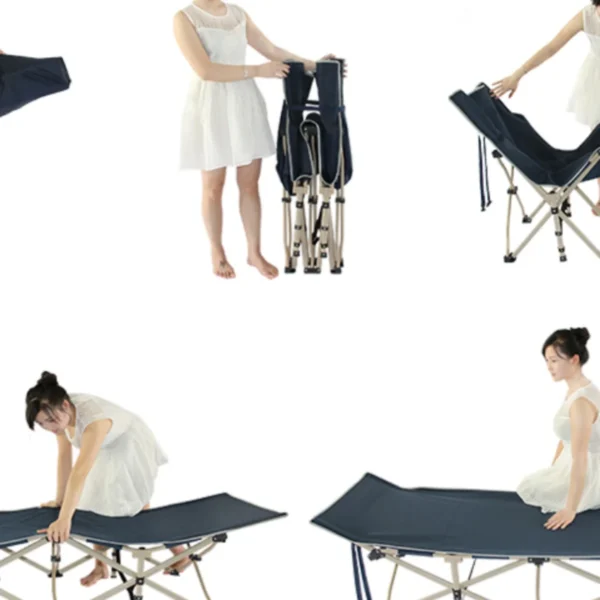
Portable Folding Bed for Office Naps & Outdoor Adventures Rated 5.00 out of 5$168.06 – $305.16Price range: $168.06 through $305.16
-
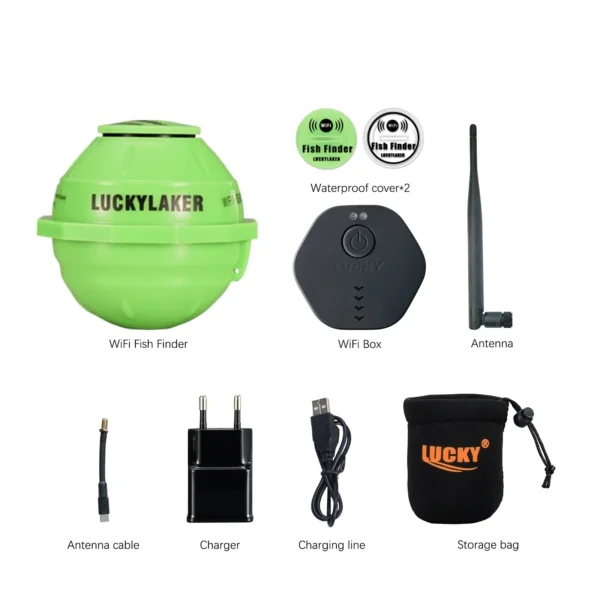
Revolutionize Your Fishing with Lucky Smart Wi-Fi Fish Finder Rated 5.00 out of 5
$197.75Original price was: $197.75.$137.82Current price is: $137.82.

Product Gallery
-
 Ultimate 2-3 Person Inflatable Kayak for Fishing Fun Rated 5.00 out of 5$1,081.72 – $1,095.09Price range: $1,081.72 through $1,095.09
 -
VEVOR 550 lb Heavy-Duty Folding Wagon & Bench for Adventurers
$155.14 – $252.20Price range: $155.14 through $252.20
-
BISINNA One-Touch Titanium Tent for 3-4 Campers, Adventure Ready Rated 4.36 out of 5
$311.78Original price was: $311.78.$217.30Current price is: $217.30.


 Camping Gear
 Camping Chair
 Camping Table
 Camping Bed
 Sleeping Gear
 Storage Bags
 BBQ Portable
 Sleeping Bags
 Camping Tents
 Gazebos
 Outdoor Cooler
 Cookware
 Power
Power Camping Light
 Flashlight
 Portable Solar
 Power Banks
 Fish Finders
 Fishing Bags
 Fishing Jerseys
 Fishing Reels
 Fishing Chairs
 Fishing Bait Boat
 Fishing Floats
 Hard Baits
 Hiking Vests
 Outdoor Bags
 Water Filters
 Paracord
 Walkie Talkie
 Paddleboards
 Boats
Boats Sea Scooter
 Accessories
 Electric Bike
 Electric Scooter
Recent Comments